Retromaster’s Electronics Projects

…related to old computers and other assorted stuff…

Cumulus Bus Saga Continues

Posted by retromaster on August 22, 2011

Here is today’s second post: Another update on Cumulus.

First, the bad news: It looks like with the most recent change to CumuluBus, Cumulus bus errors were greatly reduced, but not completely eliminated. This is the case with the long cable setup.

Now the good news: I have tried the short cable setup (using the two closely-located connectors on the IDE cable), and during extensive testing, I have not encountered any bus-related issues.

What does this mean? It means that on some Orics the long cable setup may not work properly. In these cases, Cumulus will most probably still work fine in the short cable setup, though. It will be a somewhat inconvenient, though, as the cable length is not more than 10cms.

Why does this happen? Here is my guess:

The CPLD used in the Cumulus (XC95XL series) is a relatively modern part (at least compared to the Oric, that is). It has pin signal rise times in the range of a few nanoseconds.

In the current Cumulus design, the CPLD is connected to the data bus over a level-shifter IC (also w/ fast rise times) and directly connected to most of the bus control signals. The connection is by means of the 80-wire IDE cable. When the length of this cable exceeds a certain threshold, the cable starts to exhibit “transmission line” effects. Without the necessary termination on both ends of the cable, these effects cause significant signal integrity issues.

Even with the “SLOW” rise time setting on the output drivers, the XC95XL is fast enough to limit the length of the cable to just about 10cms.

I have to admit that I have overlooked this aspect of the design. I thought that since the frequencies on the Oric bus are so low, there would not be problems over a long cable. However, I failed to see that it is the rise time that’s the real governing parameter here, which was a mistake. This is most likely why things go wrong with the long cable setup.

One way of solving this problem could be by adding “slow” (74hc or 4000-series CMOS) buffers on the Cumulus side. Since these parts have much higher rise times, the permitted cable could be much longer. An additional advantage is that this way, possibly, CumuluBus could be eliminated! However, it would take a significant redesign effort, and it would enlarge the main PCB by quite a bit. To tell the truth, I am not really motivated to go through another design cycle, especially considering that Cumulus seems to work fine with the short cable setup.
Posted in Projects, Retrocomputing | Tagged: , , , , , , , , | 5 Comments »

Making Copper PCB Stencils for SMT Reflow

Posted by retromaster on August 22, 2011

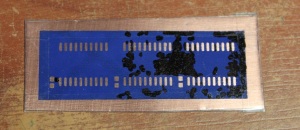
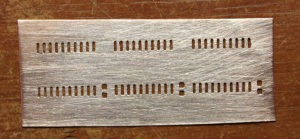
Over the weekend, I decided to try out making a stencil for solder paste from copper foil. I had thought about this previously, but after seeing an instructable on the same idea, I became more confident that it would work.

The process for making a copper stencil is basically the same as making a PCB. The resist image (i.e. paste layer, inverted) is transferred onto the copper foil using any method of your choice. For my tests, I did PnP Blue toner transfer onto 0.2mm-thick copper foil using a laminator. Afterwards, the back side of the foil is covered to prevent etchant from eating away all the copper. I used clear packing tape for this step. The one crucial thing here is to make sure no air bubbles remain in between the tape and the foil. Finally, etching is performed as usual and after cleaning and removal of the tape, one gets a nice looking stencil as shown in the photos above.

One thing to note is that, if one leaves the tape in place, this method can also be used to make simple flex PCBs. This could be quite useful for repair purposes, as well.

Although in my tests the stencil came out pretty well, the reflow (using a hotplate) did not go all that well, as the photos above show the bridges in between some of the legs. This can be due to several reasons: The paste itself wasn’t at very good condition to begin with, more flux may have been needed, the stencil may have been too thick (too much paste), and surely I could have done a better job when depositing the solder paste. Nevertheless, this is not too bad for a first try, and I am confident that I can tweak and improve the process over time for near perfect results for larger PCBs.

Posted in Homebrew PCBs | Tagged: , , , , , , , , , | Leave a Comment »

Cumulus Bus Issues Solved?

Posted by retromaster on August 5, 2011

Here’s a quick update: Apparently, swapping the AHCT variants of the buffer ICs on the CumuluBus with HC ones did the trick! Coupled with some of the changes I did to the CPLD code, Cumulus seems to be working stable with all three of the Atmos’es I have, with no video issues whatsoever. Over the weekend, if I find the time, I’ll be doing some more tests so that we’ll know for sure… and I might also work on the PIC firmware a bit as well, as there might be still some rough edges there.

I may have to do some repair work in the next days as well, since it looks like the Oric 1 I mentioned in the previous post does not work (with or without Cumulus). Fortunately, the ULA is most likely fine since there is video output (vertical B/W bars). Probably the DRAMs have died… Luckily I have stock :).

Posted in Projects, Retrocomputing | Tagged: , , , , | Leave a Comment »

Back in Action with Cumulus!

Posted by retromaster on July 28, 2011

After a few months of absence due to some personal issues, I am glad to announce that for now, everything seems to be back on track :). Now a status update on Cumulus.

Some of the close followers of the Cumulus project may already be aware that, during testing some months ago, some Oric machines failed to boot properly with Cumulus. Lately, I’ve had the chance to work on this issue. It turns out that, due to the notoriously poor clock signal of the Orics (almost sawtooth instead of square!), the bus timings were off with the machines that failed. I have managed to get the failing machines to boot, but there are still timing issues, especially with the MAP signal, as one can observe video corruption from time to time.

I am still working on a solution to this problem… One possible solution is to increase the 32Mhz clock on the Cumulus to 64Mhz. This would enable more accurate sampling of the incoming clock signal and therefor improve MAP signal timing. I do not have any 64Mhz clock oscillators handy though, so I’ll have to order them. I am also not ruling out the possibility that there may be some other signal integrity issue at play here. More tests will probably point this out.

Posted in Projects, Retrocomputing | Tagged: , , , , | 8 Comments »

MF70 CNC New Drive & Motors

Posted by retromaster on April 11, 2011

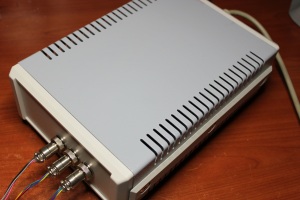
Here is the new motor driver installed and working with the new steppers. It is the infamous 3-Axis TB6560 Chinese driver commonly found on ebay. I could have designed and built my own, but the price was too attractive to pass up. The board supports 1/16 microstepping and 3.5A per channel @ up-to 36V supply. Combined with the new motors (Minebea/Astrosyn, apparently salvaged from Diebold ATMs) the speeds have more than doubled-up, at slightly more than 200mm/s.

The enclosure (from a local supplier) is of good quality, but ultimately an overkill, and it is a bit too large for this board. Unfortunately, the nearest size in the manufacturer’s catalog was just a couple of centimeters smaller than the board.

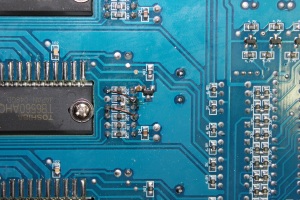
Despite all that looks good on paper, I have to be wary of recommending this driver board, because mine turned out to be defective! Upon testing, I found out that the Y-axis was not providing enough torque. Some inspection with a multimeter revealed that the DIP-switch for the Y-axis was broken, resulting in the current setting being ignored. The fix was easy, with just a couple of wires, as in the photo above. Nevertheless, this just seems like another example of fine (!) Chinese manufacturing on display.

Posted in Projects, Robotics | Tagged: , , , , , , | 5 Comments »

Upgrading the MF70 CNC Part 2

Posted by retromaster on April 5, 2011

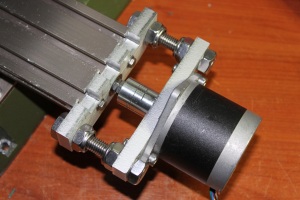
As one may guess from the photos above, the polyamide endplates did not work well at all (and that is an understatement). So I had to switch back to aluminium, as it is still rather inexpensive and in the end I was not sure if even Delrin would be rigid enough in this case. As a matter of fact, Alcofribas had suggested that I use brass instead. I might have taken that route if I did not already have some alu in hand. Brass seems to be more expensive and quite a bit heavier than aluminium, but apparently it is machined dry. My setup is rather poor in handling the coolant generally required when milling aluminium, so this would have been an important advantage.

Having to go back to aluminium motivated me to do some research in milling speeds and feeds and coolant types. I found out the MF70 spindle was powerful enough to take deeper cuts in aluminium (1.5mm vs. 0.5mm) at my current feeds (about 90mm/m and 8000rpm). Apparently these numbers are still far from optimal, but they were a big improvement over my previous setup, which took far too long to mill the parts and caused the spindle to overheat pretty quickly. If the MF70 spindle horsepower permits, I plan to even further increase feeds (once I upgrade the steppers) to see how far I can take this. I can also confirm that ethanol performs quite well as a coolant for milling aluminium.

Another “improvement” was that I finally managed to obtain a dial test indicator, thanks to ebay. Measuring the backlash on all axes, I found it to be around 0.1mm, which is not exactly low, but easily compensated in software. In fact, this performs so well that I may not even bother to implement the split-nut anti-backlash nut design I was referring to in my previous post.

Finally, even though the new parts came out quite nice, the performance improvement with the old steppers was marginal. So, I decided to give priority to upgrading the steppers and the drivers over upgrading the mechanical parts. Depending on how that goes, I will decide if it is worth to actually rebuild the Y and Z axes.

Posted in Projects, Robotics | Tagged: , , | Leave a Comment »

Upgrading the MF70 CNC

Posted by retromaster on March 16, 2011

Here is a new post after a litte hiatus.

First of all, let me get the Cumulus news out of the way: Last week, I’ve mailed the very first Cumulus board-set to ibisum for testing. He has five Atmos machines and the necessary hardware for debugging if things do not go as expected, so he is the right guy for testing at this stage. If everything goes smoothly, then I may think about organising a small production run for people who have expressed interest in purchasing Cumulus boards.

And now back to the main topic of this post. For various reasons, I decided to upgrade my MF70 CNC implementation. The aim is to fix some mechanical problems found in my original design, as well as upgrade the motors and the electronics to achieve higher speeds and precision. I even plan to try a split-nut anti-backlash design at some point.

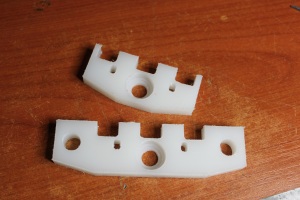
The image above shows the very first parts I’ve manufactured that are intended to replace the current endplates in the X axis. As is evident from the photo, I’ve opted for using plastics this time, instead of aluminium. Although aluminium looks far more impressive, the plastic material I use here (specifically polyamide/nylon) is much easier and quicker to machine (deeper cuts, no coolant required, etc.) with a nice enough finish and they seem to be strong enough for the application (the original parts that come with the MF70 were plastic, too). In any case, if I find that the manufactured parts do not perform to my expectations I can always try out Delrin instead :).

These parts are very similar to the current aluminium parts but there are some differences. The mounting holes have been made into slots for allowing better alignment of the leadscrew with the leadnut. The bearing housing contains an additional 14mm inner groove to allow me to test thrust ball bearings (much higher axial load capacity) instead of the standard ball bearings that I’ve been using so far (I can still use the ball bearings if for some reason I am not happy with the thrust bearings). The motors will be mounted using an additional plate bolted to the motors. That plate and the larger plate in the photo above will be bolted together with a couple of M10 steel screws using the holes on the sides.

Posted in Projects, Retrocomputing, Robotics | Tagged: , , , , , , | 4 Comments »

Cumulus Page Up!

Posted by retromaster on February 8, 2011

First of all, the Cumulus project now has a home page  :).

I’ve made a couple of important updates to the Cumulus firmware. First, I made sure that support for both Epson and Phillips LCD controllers is in place and working well (Nokia 6610 LCDs come mainly in these two flavors, as is well known now). There are a few relevant differences between the controllers, mostly in initialization of the controller and handling of screen orientation.

I also implemented bootloader support (i.e. SD card firmware update). It proved to be a little trickier than I first thought, mostly due to compiler issues and a misleading example from Microchip. The main issue was that the compiler does not actually load the table pointer for the erase operation unless you actually issue a dummy read operation first. Now it all seems to be working fine. Right now, the bootloader is larger than it needs to be (there is an embedded font I used for printing debugging messages on the LCD) and verification is missing but these are easy to fix and finalize (before a binary firmware release is made).

I’ve also populated one of the CumuluBus boards that I received and I am glad to say that it works fine.

Posted in Projects, Retrocomputing | Tagged: , , , , , , , , , | Leave a Comment »

Quick Cumulus Update

Posted by retromaster on February 1, 2011

Here is a small update on what’s going on with Cumulus: I’ve finally received the CumuluBus boards from the PCB manufacturer today. Within the next few days, I am going to assemble and test a few of them, and if all goes well, move on to assembling some full Cumulus boards.

The source code for the Cumulus firmware has been available at the defence-force SVN for some days now:
http://miniserve.defence-force.org/svn/public/oric/hardware/cumulus/.

I have not worked on the sources after I uploaded the sources though, mainly because I have been working on (yet) another, quite different project during the last week or so, while waiting for the boards. I’ll disclose the details about that soon here on the blog.

Posted in Projects, Retrocomputing | Tagged: , | 3 Comments »

More Cumulus News

Posted by retromaster on January 17, 2011

Time for some more Cumulus news. There is not a lot, this time, though.

Over the last few days, I’ve worked on the firmware and made numerous small improvements and fixed some minor bugs. I’ve also implemented the log feature suggested by DBug.

I’ve also had the chance to do some tests on the newly-added write feature. I found out that, there was a bug in the code that caused part of the data not being actually written to the SD card. This bug was causing, strangely enough, “Disk Full” errors when copying large files under Sedoric. I’ve fixed this bug and now files are being copied without problems. I’ve also tested saving a game in Space 1999 and that seems to work, too.

Finally, I ordered yesterday some CumuluBus boards from the PCB manufacturer. I should receive them sometime next week, if all goes well. In the meanwhile, I’ll try to locate a cheap local source for the LCD modules. Afterwards, I plan to start assembling some boards :). Also, I am going to put up a project page for Cumulus very soon.

Posted in Projects, Retrocomputing | Tagged: , , , , | 12 Comments »