Archive for the ‘Robotics’ Category
Posted by retromaster on April 11, 2011
-
-
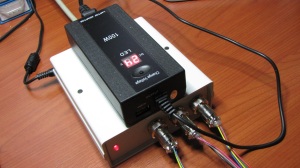
TB6560 Drive (Box Closed)
-

-
TB6560 Drive (Box Open)
-
-
TB6560 Drive Y-Axis DIP-Switch Fix
Here is the new motor driver installed and working with the new steppers. It is the infamous 3-Axis TB6560 Chinese driver commonly found on ebay. I could have designed and built my own, but the price was too attractive to pass up. The board supports 1/16 microstepping and 3.5A per channel @ up-to 36V supply. Combined with the new motors (Minebea/Astrosyn, apparently salvaged from Diebold ATMs) the speeds have more than doubled-up, at slightly more than 200mm/s.
The enclosure (from a local supplier) is of good quality, but ultimately an overkill, and it is a bit too large for this board. Unfortunately, the nearest size in the manufacturer’s catalog was just a couple of centimeters smaller than the board.
Despite all that looks good on paper, I have to be wary of recommending this driver board, because mine turned out to be defective! Upon testing, I found out that the Y-axis was not providing enough torque. Some inspection with a multimeter revealed that the DIP-switch for the Y-axis was broken, resulting in the current setting being ignored. The fix was easy, with just a couple of wires, as in the photo above. Nevertheless, this just seems like another example of fine (!) Chinese manufacturing on display.
Posted in Projects, Robotics | Tagged: CNC, drive, HY-CNC, Proxxon MF70, step motor, Stepper, TB6560 | 5 Comments »
Posted by retromaster on April 5, 2011
-

-
MF70 CNC Mk.2 X Axis Endplates
-
-
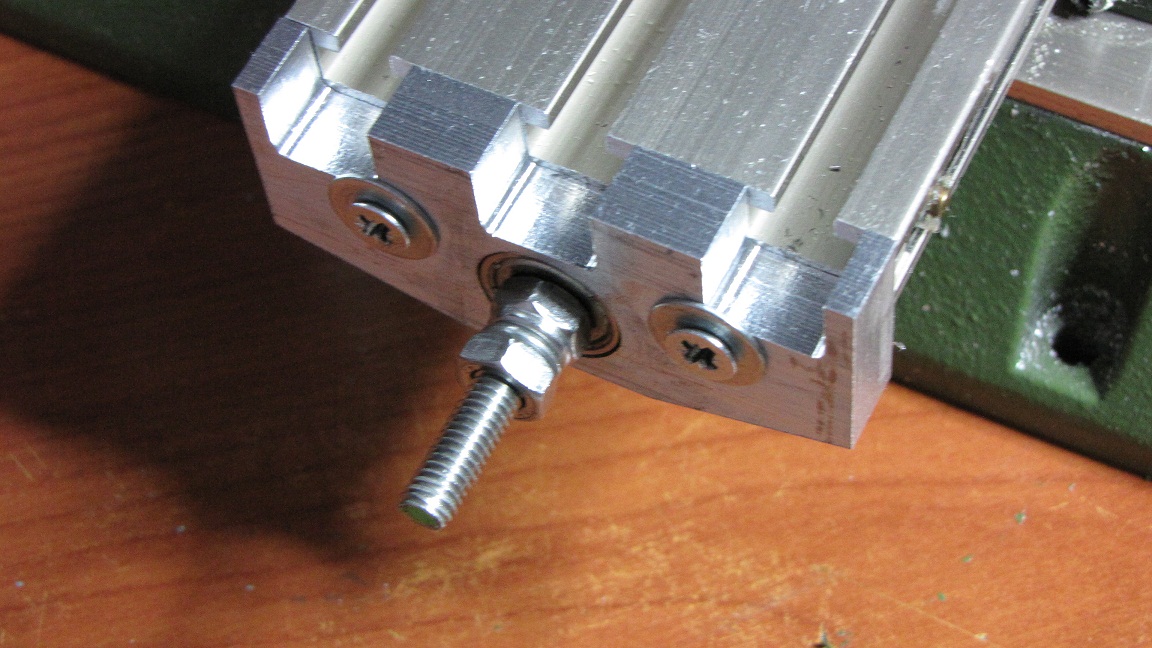
MF70 CNC Mk.2 X Axis Closeup
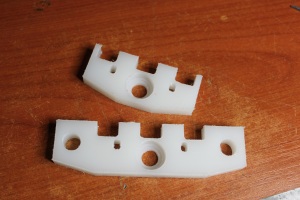
As one may guess from the photos above, the polyamide endplates did not work well at all (and that is an understatement). So I had to switch back to aluminium, as it is still rather inexpensive and in the end I was not sure if even Delrin would be rigid enough in this case. As a matter of fact, Alcofribas had suggested that I use brass instead. I might have taken that route if I did not already have some alu in hand. Brass seems to be more expensive and quite a bit heavier than aluminium, but apparently it is machined dry. My setup is rather poor in handling the coolant generally required when milling aluminium, so this would have been an important advantage.
Having to go back to aluminium motivated me to do some research in milling speeds and feeds and coolant types. I found out the MF70 spindle was powerful enough to take deeper cuts in aluminium (1.5mm vs. 0.5mm) at my current feeds (about 90mm/m and 8000rpm). Apparently these numbers are still far from optimal, but they were a big improvement over my previous setup, which took far too long to mill the parts and caused the spindle to overheat pretty quickly. If the MF70 spindle horsepower permits, I plan to even further increase feeds (once I upgrade the steppers) to see how far I can take this. I can also confirm that ethanol performs quite well as a coolant for milling aluminium.
Another “improvement” was that I finally managed to obtain a dial test indicator, thanks to ebay. Measuring the backlash on all axes, I found it to be around 0.1mm, which is not exactly low, but easily compensated in software. In fact, this performs so well that I may not even bother to implement the split-nut anti-backlash nut design I was referring to in my previous post.
Finally, even though the new parts came out quite nice, the performance improvement with the old steppers was marginal. So, I decided to give priority to upgrading the steppers and the drivers over upgrading the mechanical parts. Depending on how that goes, I will decide if it is worth to actually rebuild the Y and Z axes.
Posted in Projects, Robotics | Tagged: Aluminium, CNC, Proxxon MF70 | Leave a Comment »
Posted by retromaster on March 16, 2011
-
-
MF70 CNC Mk.2 Polyamide X-Axis Endplates
Here is a new post after a litte hiatus.
First of all, let me get the Cumulus news out of the way: Last week, I’ve mailed the very first Cumulus board-set to ibisum for testing. He has five Atmos machines and the necessary hardware for debugging if things do not go as expected, so he is the right guy for testing at this stage. If everything goes smoothly, then I may think about organising a small production run for people who have expressed interest in purchasing Cumulus boards.
And now back to the main topic of this post. For various reasons, I decided to upgrade my MF70 CNC implementation. The aim is to fix some mechanical problems found in my original design, as well as upgrade the motors and the electronics to achieve higher speeds and precision. I even plan to try a split-nut anti-backlash design at some point.
The image above shows the very first parts I’ve manufactured that are intended to replace the current endplates in the X axis. As is evident from the photo, I’ve opted for using plastics this time, instead of aluminium. Although aluminium looks far more impressive, the plastic material I use here (specifically polyamide/nylon) is much easier and quicker to machine (deeper cuts, no coolant required, etc.) with a nice enough finish and they seem to be strong enough for the application (the original parts that come with the MF70 were plastic, too). In any case, if I find that the manufactured parts do not perform to my expectations I can always try out Delrin instead :).
These parts are very similar to the current aluminium parts but there are some differences. The mounting holes have been made into slots for allowing better alignment of the leadscrew with the leadnut. The bearing housing contains an additional 14mm inner groove to allow me to test thrust ball bearings (much higher axial load capacity) instead of the standard ball bearings that I’ve been using so far (I can still use the ball bearings if for some reason I am not happy with the thrust bearings). The motors will be mounted using an additional plate bolted to the motors. That plate and the larger plate in the photo above will be bolted together with a couple of M10 steel screws using the holes on the sides.
Posted in Projects, Retrocomputing, Robotics | Tagged: Atmos, CNC, Cumulus, Floppy Emulator, Oric, Polyamide, Proxxon MF70 | 4 Comments »
Posted by retromaster on February 16, 2010
I’ve put up a page that describes my Proxxon MF70 to CNC conversion. It contains photos (most of which were already on my blog here), schematics, drawings, board layouts, source code, etc. You can see it here.
Posted in Projects, Robotics | Tagged: CNC, Proxxon MF70 | 2 Comments »
Posted by retromaster on February 8, 2010
-
-
Y Axis Version 3
-
-
Z Axis Version 3
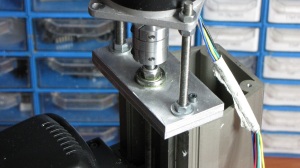
Here are the final versions of Y and Z axes of my CNC-converted MF70. The Z axis end-plate consists of two 5mm thick aluminum plates bolted back-to-back. One ball bearing is mounted in each plate, held in place together with the tightened nylon-insert nuts on the leadscrew. To clear the ball bearing on the bottom side I had to raise the end-plate using two nuts as spacers (not shown in the photo). I’ve also replaced the coupling with the new flexible one. It looks and performs considerably better than the previous version.
In the previous version, the Y axis leadscrew was supported at both ends. Instead, I decided to switch to a single side support scheme similar to the Z axis. This has the advantage that, on the other end, the carriage can move all the way to the Z axis column. I had to mill a new standoff for the end-plate in order to make room for the second ball bearing. This standoff is screwed to the lower table base to make it sit perfectly flat. To make sure that the single side support does not cause an issue, I’ve also built a new delrin nut that is a bit taller one one side than the original one, so that it tightly sits and slides on the lower aluminum base of the table, creating kind of an additional support. Overall, this new version of the Y axis is a very good performer and the travel has been extended to around 92mm, effectively doubling the stock MF70 travel.
For the moment, minor corrections and improvements aside, I consider the machine complete. In the future, perhaps I may switch to higher torque motors and more sophisticated drivers to improve on speed and smoothness. My intention now is to put together a project page to document the final state of the machine and provide some technical information, schematics, drawings, etc.
Posted in Projects, Robotics | Tagged: CNC, Proxxon MF70 | 1 Comment »
Posted by retromaster on February 3, 2010
-

-
X Axis v3 Front
-

-
X Axis v3 Back
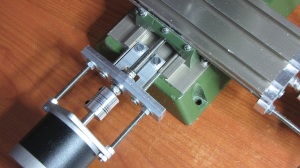
Here is the third and hopefully final version of the X axis. In addition to installing the latest parts I’ve milled, I’ve also replaced the couplings with flexible ones from my previous post. There was not a big improvement speed-wise, but this new X axis is quite a bit more reliable and robust than the previous versions. Not to mention that it looks a lot better, too 🙂
Next, I’ll be working on the Y and Z axes. I haven’t yet made a version of the Z axis with ball bearings, and the Y axis could still use some improvements. There is still some work to do, but I think I am getting closer to completing this project.
Posted in Projects, Robotics | Tagged: CNC, Proxxon MF70 | Leave a Comment »
Posted by retromaster on February 1, 2010
-
-
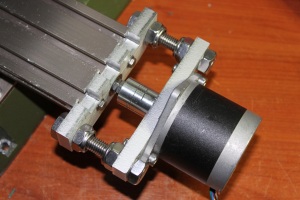
X axis v3 and flexible couplings
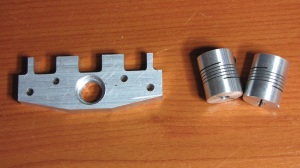
To the left of the photo above is the latest part I’ve milled using the MF70 CNC. It’s for the third version of the X axis, out of 10mm thick aluminum. It turned out very nice, but I’ve had to solve some problems before getting this result.
First, the X axis started missing steps randomly, then after a short while it stopped moving altogether. It was definitely not a mechanical problem, so after a little bit of debugging the drive circuitry I found out that one of the optocoupler chips on the breakout board had died. Replacing that chip solved that problem.
The next problem was even more critical that it actually ruined a couple of workpieces until I found about it. I was using a very popular piece of CNC software that runs under Windows XP. However, apparently, it was missing steps! I first noticed the problem when I saw that the two circles that form the bearing housing in the middle were not concentric. I did a test, by issuing a “goto to zero” command after milling the first circle. It was off by almost half a millimeter in both X and Y axes. This behaviour was reproducible and I did not think that it was mechanical. So, I installed EMC2 (together with Ubuntu) on the very same machine. Milling the same part with EMC2 gave the perfect results in the photo above. I suppose that the EMC2 installation coming with a Linux kernel patched with realtime extensions may have something to do with that.
I also found locally some good quality flexible couplings for a reasonable price. I’ll use those for replacing the (rather poor) rigid couplings I am using right now. They have a 6.35mm opening on one end with fits the motor shafts perfectly, and the other end is 4mm. So, I’ll need to machine the leadscrew ends to meet that diameter, but that’s not a problem.
Posted in Projects, Robotics | Tagged: CNC, Proxxon MF70 | Leave a Comment »
Posted by retromaster on January 27, 2010
-
-
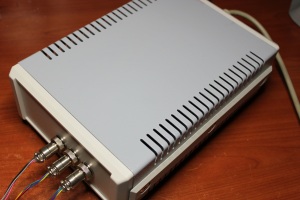
New Stepper Drive in its Box
Here is a photo of the new stepper driver assembled in its box, along with the laptop power supply I use to power it (and the steppers). The parallel port connector, power input and power switch are in the back. Now that the new driver has made the machine much faster, it’s become a lot more fun to use it :). In addition, with all the little improvements like the new connectors and the advanced PC software control, it has become much more reliable, too. Since the motors do not draw a lot of current, the box does not seem to get very hot (not that it’s difficult to rectify in case that happens). Now I’ll go back to improving the mechanics of the machine, as there is still some work to do in that area.
The faces of the box were cut using the CNC itself. One thing I found out (!) was that using a 3mm cutter at a high RPM to cut ABS plastic does not work very well. It melts the plastic and leaves a terrible finish, not to mention the melted plastic sticking to the cutter. I had to switch to a 1mm cutter, reduce the RPM, and make sure that the whole thing stays cool. This way I was able to get perfect cuts.
Posted in Projects, Robotics | Tagged: CNC, Proxxon MF70 | Leave a Comment »
Posted by retromaster on January 26, 2010
-

-
New Parallel Port Stepper Driver Boards
I’ve finished building the new bipolar stepper driver. I’ve tested it, and it works, with a big speed/torque increase. There are two boards, a parallel port breakout board (with optical isolation) and the actual stepper driver board that accepts step and direction pulses. As I’ve mentioned in previous posts, I’ve gotten rid of the current sensing resistors and gone for a fixed frequency PWM chopper scheme instead. This seems to be sufficient for the motors I currently use, but I am definitely interested in trying out more elaborate driving schemes with more capable (higher current, lower voltage) motors in the future.
Both boards are designed to be mounted in the plastic enclosures as shown in the photo. There will be a 4-pin round connector for each axis and a power led on the front side of the box. On the back side will be the parallel port and power connectors as well as a power switch. I might also put some ventilation holes somewhere on the box but I am not sure that they will be necessary. Cutting the plastic plates for the sides of the enclosure will be the first order of business for the new drives.
Posted in Homebrew PCBs, Projects, Robotics | Tagged: board, CNC, PCB, Proxxon MF70, Stepper | Leave a Comment »
Posted by retromaster on January 21, 2010
-

-
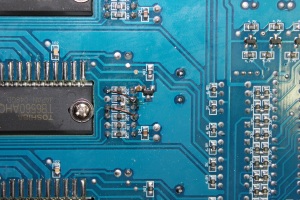
First Good PCB with the MF70 CNC
I’ve finally managed to manufacture a good-looking single-sided PCB using my CNC MF70 and toner transfer. I first drilled the holes using the CNC, then I applied toner transfer aligning the transper paper with the holes. I’ve etched the board afterwards but not cleaned the toner yet. The PCB is a parallel port breakout board. I’ll use it for the new parallel port-based stepper drives. Tracks are 20mil with 10/12mil clearance. This time, I’ve used ink jet transparency film, as it’s a bit easier to align with the board holes. The results are quite good (the photo does not do it justice), though I am not sure how it’ll perform with finer traces. The text at the bottom turned out all right so I guess it could work. Soon I’ll try out another board with PnP Blue.
The most significant problem I’ve faced so far was the alignment of the drilled holes with the toner transfer printout. It seems that the printout function of the PCB layout software I am using was inaccurate, as it introduced a kind of shearing transformation to the printed pattern. The effect was very slight but enough to cause mismatch. It would not be fair to fully blame the software though, as the printout function was mainly intended for documentation purposes and laser printers can be inaccurate anyway. The solution I found was to first export Gerber files, then use the excellent gerber2pdf.py utility by Joseph C. Chavez. Printing the resulting pdf file solved the shearing issue, but there was still a linear mismatch in the Y axis of about 1%. I’ve done some searching on the net and it seems that this kind of mismatch can be expected from laser printers. The gerber2pdf utility accepts a scale factor as input, so this was easily fixed, and the result is the board I mentioned earlier in this post. The alignment is now almost perfect, although the scale coefficient could probably use some finetuning.
Posted in Homebrew PCBs, Robotics | Tagged: board, CNC, PCB, Toner Transfer | 1 Comment »